 expert
We may be compensated if you purchase through links on our website. Our team is committed to delivering honest, objective, and independent reviews on home products and services.
More
 Tape measure
- Pencil
- Rafter square
- Drill/driver
- wood shims
- Hammer
- socket wrench
- Hammer drill
- masonry bit – 5/32-inch
- Masonry bit – 5/16-inch


Installing shutters on a brick house can boost its curb appeal while giving you some functional benefits. This classic architectural feature not only adds charm but also offers protection from the elements and potential intruders. While the process may seem daunting, you can install your own shutters with the right tools and guidance. This article will walk you through the steps to measure, select, and install shutters on a brick house.
Shutter Installation: Overview
Installing shutters on a brick house involves careful planning and execution. The process typically takes two days to complete, with the first day dedicated to measuring and purchasing the shutters and the second day for the actual installation.
This project requires attention to detail and precision to ensure the shutters fit perfectly and function properly. While the project itself is relatively easy, accessing upper-level windows can be challenging. For safety, use secure ladders or scaffolding and have a spotter present during the process.
Measure the Window Opening

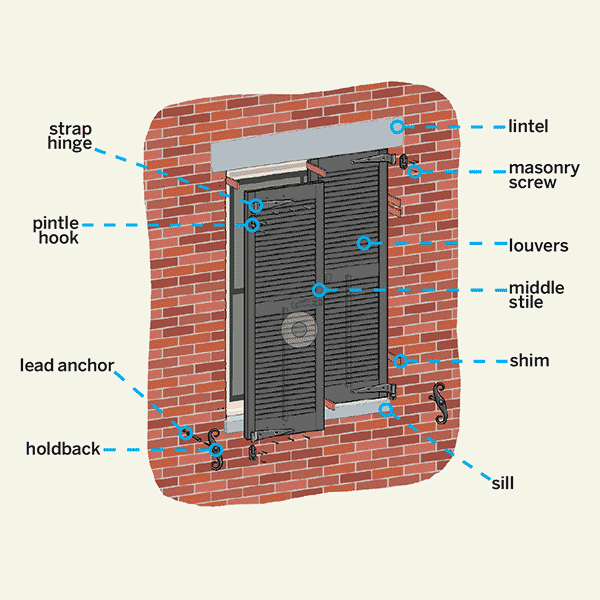
The first step is to accurately measure the window openings. To measure the width, take measurements from brick to brick at the top, middle, and bottom of each opening. For the height, measure in three spots between the lintel and the sill. Measure the depth from the wall to the window casing to determine the hardware needed. Remember the adage “measure twice, cut once,” as double-checking your measurements can prevent costly mistakes. Having a helper to hold the end of the tape measure can also give you more accurate measurements.
Size the Window Shutters

Once you have your measurements, it’s time to determine shutter sizing. Use the narrowest of the three width measurements and subtract 3/4-inch (or follow the manufacturer’s recommendations) to allow for a gap when the shutters close. Divide this number by two to find the width for each individual shutter.
For the height, use the shortest measurement and subtract 1/2-inch to leave a slight gap at the top and bottom. This ensures the shutters will fit comfortably within the opening without binding. After receiving your shutters, dry-fit each one in its opening to verify the sizing before installation.
Install the Hinges

To install the hinges, place the shutters side by side on a worktable with the louvers slanting downward and away from the house when closed. Measure and mark lines bisecting the top and bottom rails of each shutter. Starting with the left shutter, center a strap hinge over the line, aligning the fastener hole of the strap end with the center of the stile. Drill pilot holes and secure the hinges with the provided screws. Repeat this process for all four hinges, taking care to ensure that the knuckles (gudgeons) on adjoining shutters mirror each other for proper alignment.
Fit the Shutters

Set the shutters in place inside the window opening, aligning them with each other at the top and bottom while ensuring they’re flush with the brick facade. Center the shutters within the opening by eye, and use wood shims to hold them securely in place on all four sides.
This step allows you to visualize how the shutters will look when installed and make any necessary adjustments before permanent installation. Take the time to adjust and fit the shutters so you don’t have to make adjustments later on.
Set the Pintle

The pintle allows the shutter to swing open and closed. With the shutters set in place, slide a pintle up through the gudgeon of a strap hinge. Position the pin base snugly against the hinge and mark the pintle’s fastener locations on the brick. Careful marking and positioning of the pintles ensure that your shutters will work properly and hold up over time.
Drill the Pilot Hole

Drilling pilot holes is the first step in securing the pintles to the brick facade. Use a hammerdrill fitted with a 5⁄32-inch masonry bit for this task. Hold the pintle firmly against the brick at the marked locations and drill through the plate and into the brick. Start slowly and maintain a level, steady position to avoid creating oversized or misshapen holes. To remove brick dust, keep the bit spinning as you withdraw it from the hole.
Fasten the Pintle

Use a drill/driver to insert a 3/16-by-1-and-3/4-inch self-tapping masonry screw into each pilot hole. Drive the screw until the head is flush with the pintle plate for a secure and level attachment. Repeat this process for all remaining pintles. Maintain consistency in placement and tightness across all attachment points. A securely fastened pintle ensures that the shutters will remain firmly attached to the house, even in poor weather conditions.
Attach the Strike Plate

The strike plate keeps your shutters secure when closed, providing both security and protection from the elements. Working from inside the house, measure and mark the midpoint of the middle stile on each shutter. Center the strike plate on one shutter, positioning it 1/8-inch from the edge. Hold the plate in place, drill pilot holes, and fasten it to the shutter using the screws provided.
Fasten the Sliding Bolt

Installing a sliding bolt complements the strike plate, creating a secure closure system for your shutters. Use a rafter square to position the bolt on the opposite shutter, centering it along the middle stile and setting it 1/8-inch from the shutter’s edge. Drill pilot holes and secure the bolt to the shutter using the included screws. After installation, close the shutters and test the latch to ensure smooth operation and alignment with the strike plate.
Drill the Holdback Hole

Holdbacks keep your shutters securely open and prevent damage from wind. Swing the shutters into the open position and measure spots on the brick facade 1 inch below the bottom edge of each shutter, centered on its width. Using a hammerdrill with a 5/16-inch masonry bit, drill a hole at each marked location to a depth of 3 inches. Start slowly and ensure your drill bit remains perpendicular to the brick surface in all directions to create clean, precise holes for the holdback anchors.
Set the Anchor

After drilling the holdback holes, remove any brick dust to ensure a clean surface. Insert a 5/16-inch lead anchor into each hole, gently tapping it with a hammer until it sits flush with the brick face. This provides a secure base for attaching the holdback, ensuring your shutters remain safely open when you want them open.
Attach the Holdback

The final step is attaching the holdbacks. Thread a lag bolt through each holdback and position the tip of the bolt into the prepared hole. Gently tap the bolt a few times to help seat it in the anchor, then use a socket wrench to fully tighten the lag bolt into the hole. This secures the holdback in place, allowing you to prop open your shutters safely and easily.
Source: https://www.thisoldhouse.com/siding/21016555/how-to-install-shutters-on-a-brick-house
You may also like


Installing shutters on a brick house involves careful planning and execution.